Now you know the basic way to edit a photo to save it to export it. So you should be able to take a lot of your photos that you’re taking. In this article, I am going to share with you how to apply lens correction to multiple photos in lightroom.
Applying lens correction to your multiple photos is easy. Just select all of your photos and below you will find a “sync” button. Go there and click it. It will show up with a dialogue box. There you check the lens correction option and apply it.
Step By Step: Apply Lens Correction To Multiple Photos in Lightroom
It is a very easy and simple process in Adobe Lightroom Classic CC. These features may help you to fast your photo editing workflow.
- Select multiple photo by pressing in windows (CTRL+A) or by pressing CTRL and Right click on your photos.
- Check the “Sync” button down below and it’s may open a dialogue box.
- Now Check the Lens Corrections
- Press Synchronize Button and It’s DONE.
Basic Lightroom Photo Editing
Basic lightroom photo editing means fixing things like exposure and white balance and save them and share them with the world. That it or you can do it very easily using our free lightroom presets and download it for absolutely free of cost.
But I want to continue to teach you some of the awesome features that Adobe Lightroom CC has to offer. So I’m going to go through some of these other editing options that we haven’t gone through of our other articles.
What is Lens Corrections in Lightroom?
It’s a really quick technique or trick that will quote-unquote correct the way that your lens sees. So there are two options in this feature. if you select a photo you’ll see that none of these options are checked initially.
What In This Lightroom Correction Options?
So you have two options. These are
- Remove chromatic aberration and
- Enable lens profile corrections
What is Chromatic Aberration In Lightroom?
Chromatic Aberration is a color sort of distortion. That may happen and you may see along the edges of things in your photos like purple lines or red or green lines or some just sort of color distortion.
So if you see that in an image. You can check that on and it will try to remove it.
Pro Tips: If you use some of the premium and professional lens these color distortion may not happen to your pictures. There’s not really any showing up in my photos right now. But I just wanted to make that note unable for you.
Lightroom Pro Tips
To enable profile corrections though this will definitely change something.
Watch what happens when I check this see how this image this wide shot gets a little bit. Well to me it looks warped and unbends. And then the vignette around the edge becomes a lot lighter
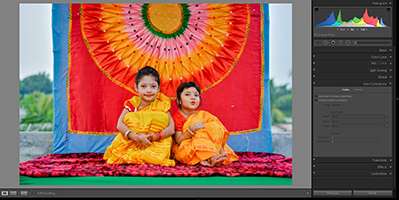
That’s basically what this profile correction does.
If there’s a vignetting that naturally comes from your lens it will try to remove that so that there’s no actual vignette and it looks more natural as if you were just there in the moment looking at the scene.
Select Lens Profile and Camera Are You Using
You’ll notice that it has the lens profile from the camera and lens. If this doesn’t show up if you’re using an older camera that doesn’t include the metadata that’s for the lens being used.
You can go through and choose the specific lens that has pretty much any lens that you’re using and depending on which lens you choose it will try to fix it.
Disclaimer: But you want to make sure that you’re using the same lens that you’re actually using.
Manual Adjustment For Distortion and Vignetting
You can also go for word and do some manual adjustments down here to fix the distortion or the vignetting even more.
So if I do this distortion you can swipe the scroller and kind of see what’s happening. It’s kind of stretching your photo and It’s flattening it out.
It looks like it’s stretching it. But it’s actually flattening out the image and then same with the vignetting it’s going to keep the vignette. The natural Vignette or it’s going to remove it.
So that could be kind of a stylistic thing.
Keep Experimenting With Other Images
I’ll just show you one more image. This is a macro photo.
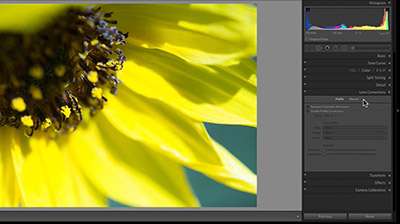
So here, if we check on profile corrections you can see it’s very subtle but it basically flattens out the image. No one’s really going to notice unless you’re using a very wide lens like a fish Island.
It will be more pronounced if you just click the manual button up at the top. You can adjust things like distortion.
And this is kind of extreme.
You can get kind of cool effects if you want if you check on the constrained crop when you do that. It will increase the size of your photo so it doesn’t have those white edges on the sides.
Manual Chromatic Aberration In Lightroom
When you are doing a distortion adjustment then you have the fringe which is the what is happening with the chromatic aberration.
So if we take our eye dropper and we go to the edge pick a fringe color which is green and then we do that before and after.
It’s so subtle it’s so hard for you to see.
But I can actually see it with it before you see the green after.
Without the green.
So that can help slightly and you can adjust the hues and the amount that you’re looking it has the purple or the magenta amount and then the green amount.
That’s basically the colors you get from chromatic aberration and you could increase sort of the amount of colors you’re trying to de-friended.
Now if I do that you can see the edges become sort of like highlighted like glowing.
So I don’t want that necessarily so I’m going to undo that go back to where it was. So that can help fix the colors on edge.
Conclusion
Yeah, that’s pretty much all you have to know about How To Apply Lens Correction To Multiple Photos in Lightroom. If you have any questions let me know but play around with it.
These are again things that are a more advanced level. But it’s something that you might be interested in if you’re getting very particular with your photos.
Thanks a lot for reading and we’ll see you in another article or you can also download this popular urban lightroom presets.



Leave a Reply