Newbie photographers are always want to know how to edit like a pro. If you are a beginner photographer or new lightroom user and wanted to know the fundamentals of lightroom photo editing. You are in the right place.
In this lesson, we’re going to cover how to change color profiles in Lightroom Classic CC. Now, this is only available in the latest version CC 2020 and also available in older versions of cc 2018.
Personal Opinion and A Short Story: It’s a long story of mine as a newbie photographer and learning new things in this creative industry. I don’t know anything about how to edit a photo. But I took my time and learn some basic things about photo editing in lightroom. You know these basic lessons give me a push up to know how to edit like a pro.
How To Change Color Profile in Lightroom CC
This was something that before you could edit down below with some calibration and color effects down at the very bottom of your tools. But now it’s right up the top corner of the lightroom.
If you don’t find the color profile option.
In the Lightroom Classic CC 2020 (Updated Version), if you go to the right panel of lightroom. You will find the basic panel and here you find the profiles with some basic list of color presets. Open the list and it will show color, modern 04, monochrome and a browse option for selecting the custom presets.
Here is an image that will help you visually to change color profiles and its very important for new users.
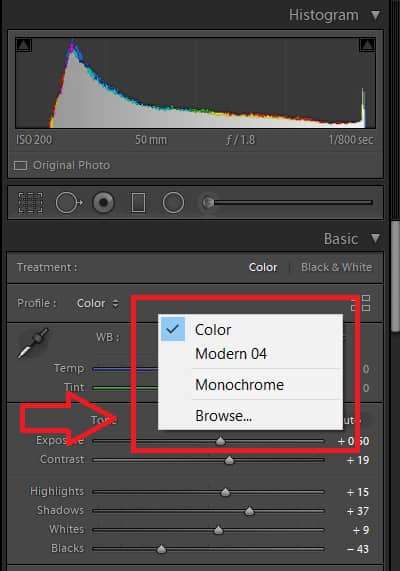
So you’ll see first that there’s this profile and then there’s a drop down with a few different presets. These will pop up when you shoot in RAW image mode.
Choosing Basic Colors Profile Presets In Lightroom CC
- Adobe Color: The standard is Adobe color and this is basically just choosing the standard colors that are basically coming straight out of your camera. If you change these are sort of preset color modes that Adobe has that they think you might like.
- Adobe Landscape: This landscape preset will try to enhance colors for both portraits and your beautiful travel photos.
- Adobe Portrait: This will soften the overall photo and it looks like a clean and bright image.
- Adobe Standard: The standard is sort of like neutral and just plain colors.
- Adobe Vivid: So you have vivid which makes everything a little bit more saturated and contrast.
Choosing More Advance Color Profile Presets In Lightroom CC
And then we also have this button right here this sort of like four boxes. if we click that and opens up the profile browser and if you open that you’ll probably see more colors preset menu something like this.
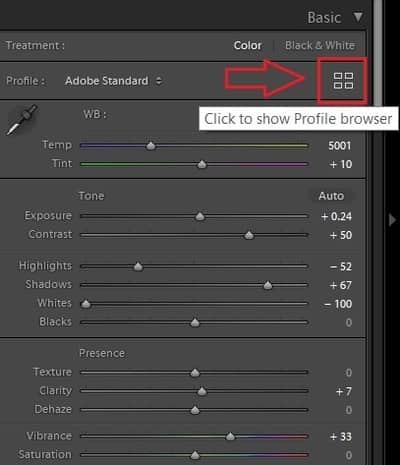
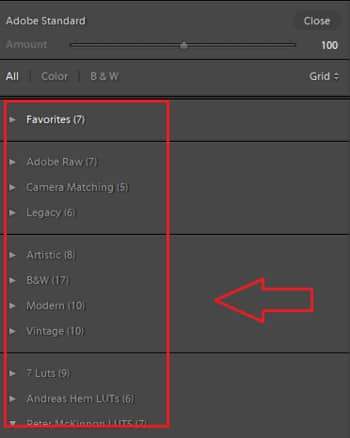
Here we will find all of our different preset color profiles.
So at the top, we have the Adobe raw presets which we just saw. And then next we have a camera matching presets folder. These will depend on the camera that you’re using.
Each camera has a number of color profiles. A lot of times they are similar to what the Adobe raw ones are such as landscape, portrait, neutral, monochrome.
So if your camera is a modern camera, the lightroom can tell from the metadata from the photos what camera was being used.
They’ll actually import or not import but they’ll have the preset sort of color styles if you want to change and use one of those profiles and you don’t have to do this in camera.
You also have some legacy sort of preset styles that were from the previous versions of Lightroom and then you have these new artistic, black and white, modern and vintage ones and these are the presets I would definitely check out.
You have some more creative ones that can really make your colors a little bit more interesting like for example.
Artistic six looks really cool.
Control The Amount Of Color Profile Presets
Now to apply them all you have to do is click on the profile and then when you do that you see a slider up at the top with an amount.
You can drag it to the left to decrease the amount of color added or color editing it does and then drag it to the right to actually duplicate sort of that effect or increase it.
So the standard is at 100 and as always if we just double click in the slider it will reset it to what it was before.
Now if you’re happy with this all you have to do is click close and you’ll now see that we do still have this amount slider up here.
Let’s Choose a Color Profile Preset
If you want to get rid of that or go back to that original Just click the dropdown and choose Adobe color.
The other thing just to know is that you can favorite These So, for example, say you’re always using artistic 6.
Just click the Add to favorites start button and the top right that’s going to make it appear in this favorites folder. Which you can actually edit by unstringing and be selecting the ones you want to include in your favorites.
And then if we close this we have under the dropdown menu right here we have artistic 6. Which is now one of our favorites and you can quickly get to from the dropdown menu.
Related Article: 10 Best Dark & Moody Lightroom Presets Free Download
Cool so these are some additional editing tools that you have in the newer versions of Lightroom but they’re really cool and a great way to start automatically editing your colors.
And basically as you can see here if I scroll down it’s not actually adjusting the color effects that you’re applying in the development tab.
It’s just basically reading the colors and showing you the colors based off of a profile.
I know it’s a little confusing, but it’s basically happening before we add any of these other effects down here.
Change Image Color Using Custom Lightroom Presets
Lightroom is a very popular and useful tool when it comes to photo editing. It also offers many options. Here Lightroom gives us another option to change color to our images.
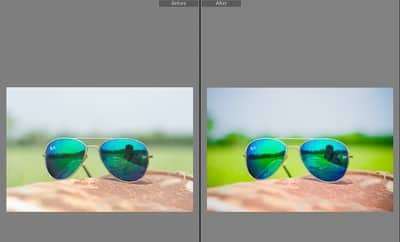
Here is a before and after look of the presets. I am offering free lightroom presets for beginner photographers. If you want to download it for without any cost (Click Here To Download)
Lightroom presets are very easy to apply to your image. If you don’t know about the presets. Then here is an article I have written for you on how to add lightroom presets.
Conclusion
Lightroom is always very easy for newbies. But it is a very powerful tool that can help you to get a marvelous result for your photos. A good quality photo looks better after editing.
Many beginner photographers use mobile to take their photos. But if you wanted to do better in this field, I prefer to buy a basic camera or an entry level camera. If you want my recommendation order this (Canon M50 with Kit).
If you already have a camera then always shoot in RAW format. This image quality will better than JPEG. It’s my personal experience. RAW image format collects the data while you are capturing it. It a very good practice being a professional photographer.
Was this article helpful for you?
Let me know if you have any other questions and we’ll see you in another lesson. Thank You

Leave a Reply