All right let’s dive right into Lightroom.
This lesson is for how you import photos into Lightroom CC. So make sure you download the practice photos that we’re going to be working with throughout the rest. Once you unzip that file you should have a number of folders and we’re going to be using different folders in different sections in this lesson.
The way that Lightroom works in terms of importing photos is that it is actually reading the photos and having the photos on your computer.
But it’s not actually moving the photo file, it’s just reading it from wherever you save it on your computer.
So make sure you stay organized in your documents or in your finder whether you’re using Mac or PC it doesn’t matter.
Just make sure you’re organized with your photos outside of Lightroom. So that when you get into Lightroom it’s easier as well.
So I’m going to really be showing you how to organize within Lightroom but I just want to kind of say that because a lot of photographers ask me how to organize my photos.
Make sure you’re backing up and make sure you’re organizing it. I organized by date by a year and by month and then by a shoot in a folder structure like that.
But it’s really up to you. OK so let’s get into Lightroom and it’s pretty easy.
Importing Photo and Video For Dummies
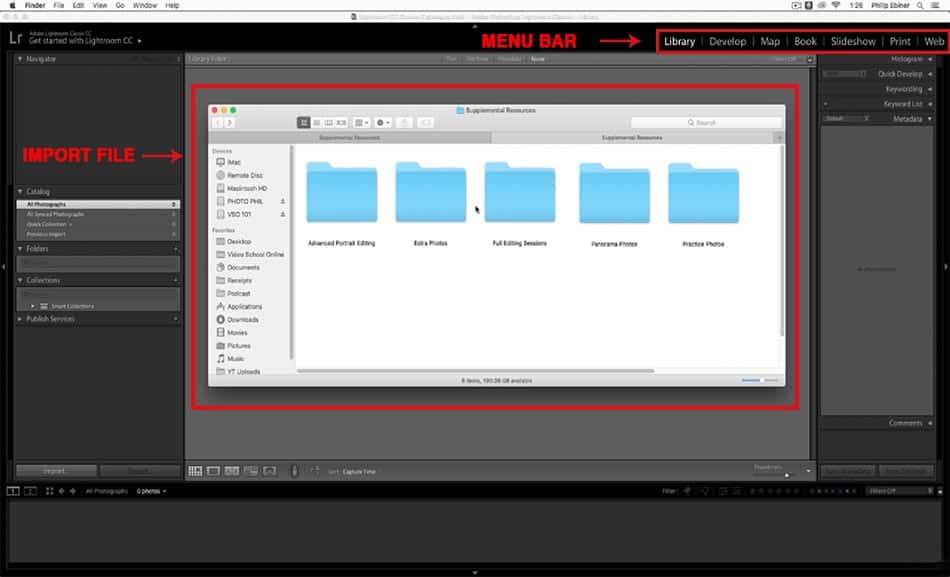
If you open up Lightroom for the first time you should see something like this up at the top you have your library you have your other tabs.
which are the different workrooms and spaces that you’re going to be able to edit photos and do things like maps and books and slideshows that we’ll talk about later in this topic.
You have your file menu and then around here, you have all kinds of different things that you don’t really necessarily you know what you’re working with yet. but we’re going to be covering this in the next lessons.
What I want you to do first though is look over here to this import button down on the bottom left.
Finding Import File and keyboard shortcuts
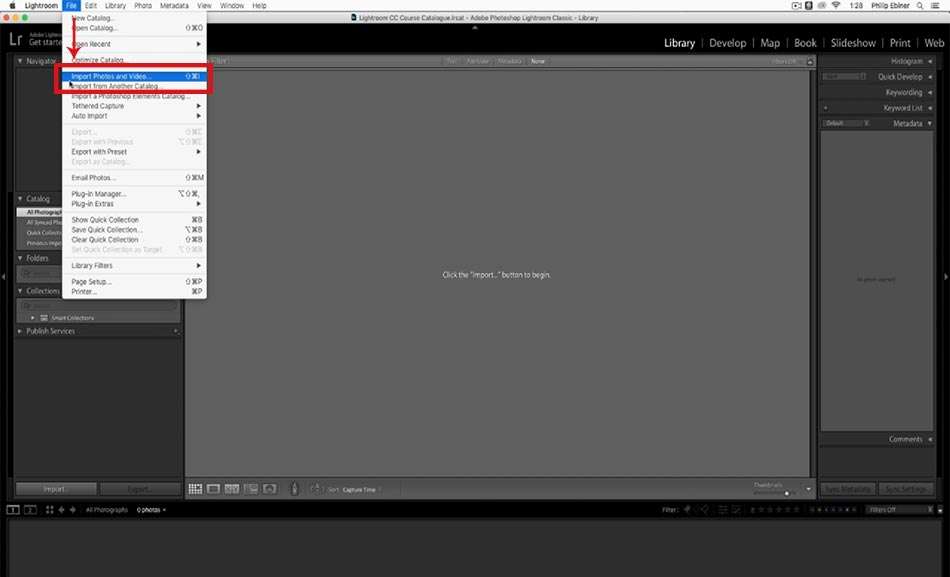
If you clicked that or if you go to file import photos and videos or if you press the keyboard shortcut
( Shift Command I )on a mac or that would be ( Shift Ctrl I ) on a PC.
You’ll open up the import window. All right so once you have the import window.
You’ll see that on the left-hand side you have the source. This is looking at your computer files and the structure of your folders or any external hard drives that are plugged into your computer.
You’ll see that if you open up these folders you’ll start to see the folder structure of your computer. Now I have these folders saved on my computer.
So if I go into those specific folders which I could find by going into my documents. So if I click on one of these folders it’s going to open up all of the photos within the folder.
If you don’t see the photos right click and make sure you choose includes subfolders. If you don’t see that that’s OK too.
You’ll see this option in the middle that says no photos found include subfolder.
Or you can just go to the subfolder so I have this advanced editing folder.
We have extra photos.
We have full editing sessions.
And when I do that we see all of the different photos pop up in this big window in the middle.
And this is where we can select the photos that we want to import.
Now I went through all of my document folders to find these supplemental resources.
But whether you put it on your desktop or it’s on an external hard drive you’re just going to find it through this sort of file menu.
So I’m just going to include subfolders.
It’s going to give you this message saying that it’s going to include all of the photos.
And now this is where you can choose what to import and what not to import.
So for us, we’re going to import all of my photos.
But if you wanted to you could uncheck photos that you don’t want to import.
You can also quickly uncheck photos with this button down here to uncheck all or go back and check all.
You can go through and open up a bigger window with this button down there.
Then you can use your arrow keys to go right and left.
And then at the bottom, you have this include an import check box.
So this is a better way to maybe see the photos if you’re on a photo shoot or if you went traveling
and shot a bunch of photos you might not necessarily need to import all of your photos.
That being said the way that I typically import photos is import all of the photos and then I’ll start
to organize later on choosing which photos I actually want to import.
Over on the right-hand side, we have some options just to pay attention to what’s automatically checked on is this don’t import suspected duplicate button.
This is important because you actually don’t want to be re-importing the same photo multiple times in Lightroom.
Because then your organization can get kind of wonky.
And if you go out and you open up Lightroom again and you’re trying to find the photo that you edited previously if you have multiple photos of the same photo or multiple versions of the same photo.
Then it’s going to get really confusing.
Another option you have here is called add to the collection now so a collection is a sort of a folder within Lightroom that is a way to organize your photos.
Now I’m going to uncheck that and we’ll look at that in a minute because we can actually add photos to collections and organize them that way in the future.
You also have some develop settings if you have an automatic sort of presets that you want to add.
which if that can be done later on we’ll learn about presets and then some metadata options.
Again not something to worry about right now when you’ve selected all the photos that you want to import
just click the import button down here.
Now actually, what I want to do is just select one of these folders one at a time to import so I’m going to start with this folder which is the advanced portrait editing folder.
So I’ve selected all of those photos and now I’m going to click Import.
So you’ll see that it imports RFI files.
We’re now back in this library tab.
Now just to show you what happens if you click on another tab.
Here we go to different sort of windows.
So the developer tab is where we’re going to spend most of our time in this area where we’re actually editing photos.
You have these other ones and then the library is really where you organize your photos.
So in this organizational structure, you have these different windows you can make these windows smaller and bigger by dragging them in and out.
You have your bar down here with all of your photos.
You can also make bigger or smaller.
And so when you’re in one of these views, for example, we can change the view with these buttons down here as well in the library.
You can also select which photo you want to look at from your tray down here your photo tray.
Now we’re going to talk about rating and ranking and filtering in just a minute.
But one other thing I wanted you to notice is your metadata which is over here.
So you have the metadata from the photo so for example if we look at one of these photos.
You’ll see if you should shoot in RAW mode specifically and depending on your camera.
you’ll see settings like your exposure shutter speed or aperture your ISO rating the camera lens that was used when it was shot.
If you have things like your GPS capability on it we’ll have like a place and that will actually help it appears on the map.
And you can also add things like keywords and things up here a little bit more advanced.
And then next we’re going to look over here on this left-hand side this window which is where you really
start to organize your photos.
And we’re going to look at that a little bit deeper in the next lesson Metering Modes Explained and Does it matter in photography.


Leave a Reply